 Windows allow you to turn on Wi-Fi hotspot on your PC and allowing your device to connect it. It can easily share your internet connection to connected devices. Thanks to a hidden Virtual Wi-Fi adapter feature and command prompt in windows. We’re here with “how to create Wi-Fi (WiFi) hotspot on your PC” and Access internet connection on your mobile and tablets.
How To Turn Windows 10 PC Into WiFi Hotspot?
Method 1: Using Command Prompt
First of all, you need to check your Wi-Fi Network card providers the ability to turn the Wi-Fi hotspot on your PC. Just follow the simple steps mentioned below.
Step 1: Open the command prompt, you need to search the “CMD” and click the “command prompt”.
Step 2: Now, just type the ‘netsh wlan show drivers’ in Command prompt window and press the enter button.
Step 3: You will see in the output windows – “Hosted network supported: Yes” which means that your PC supported hosted networks.
Must Read: How To Check Who Is On My WiFi Network?
Step 4: Now, you need to set the SSID and password to your Wi-Fi hotspot making use of the following commands.

Step 5: To start the hotspot, you need to type the ‘netsh wlan start hostednetwork’ in the command prompt. Now your Hotspot will be initiated.

Note: make sure that you have turned on Wi-Fi on your PC. This will help to transmit the signals.
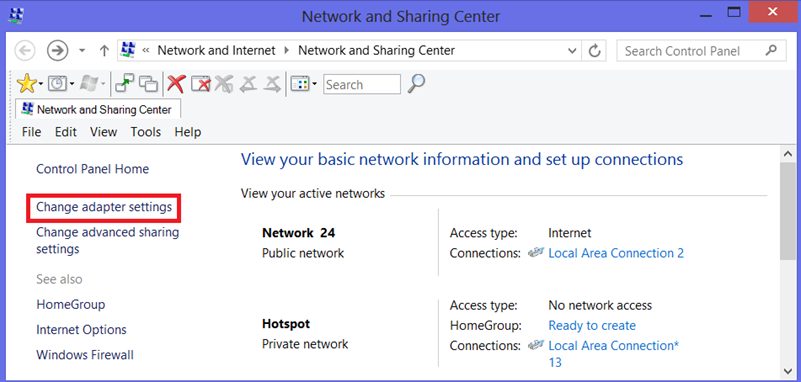
Step 6: In order to turn on Internet connection sharing on the network adapter that access to the internet, you need to follow the steps below.
Control Panel >> Network and Internet >> Network Connections.
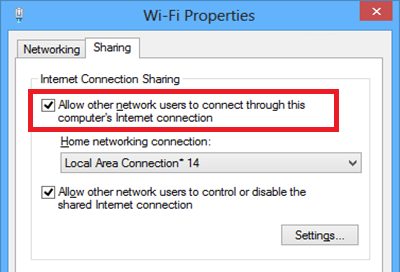
Step 7: Now, go to properties, and turn on the “Allow other network users to connect through this computer’s internet connection” under the sharing tab.
Step 8: If you want to stop or turn off the internet sharing connection (Wi-Fi Hotspot), you have to just enter the “netsh wlan stop hostednetwork.” That’s it. Every time you want to turn on/turn off hotspot, you have gone through the same process.
Method 2: Using Virtual Router
Step 1: First of all, you need to download and install the “Virtual Router” on your PC.
Download from here: Virtual Router
Also Read: Top 5 Cool Android Apps To Hack WiFi
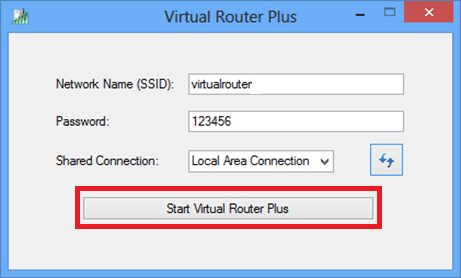
Step 2: Enter the name of your “Network Name (SSID)” and password, select the “Local Area Connection under shared connection.
Step 3: Now, click on “Start Virtual Router Plus” and your Wi-Fi will be turned on.
Was this tutorial helpful for you? Leave a comment below if you have any related queries with this. Please share your views with us. Share this article with friends. If you want to get notified with our latest updates, please Subscribe our Newsletter.


